
Practically everyone nowadays possesses a smartphone, tablet, or similar electronic devices, and the majority of these gadgets rely on a Universal Serial Bus (USB) cable for charging. Unfortunately, if your home is equipped with standard three-prong electrical outlets, you’ll need to use a bulky USB adapter that occupies the entire electrical socket to charge these devices. Wouldn’t it be convenient if you could simply plug your USB cable directly into a dedicated port on the outlet and leave the standard outlets free for other uses? Well, the good news is that you can achieve this by installing a USB outlet.
USB outlets, in addition to the traditional three-prong electrical plugs, feature designated USB ports that allow you to directly plug in your charging cables. What’s even better, installing a USB outlet is a quick and straightforward task that requires minimal tools or electrical expertise. If you’re ready to modernize your wall outlets, read on.
Choosing the Right USB Outlet:
When you’re shopping for a USB outlet, it’s essential to understand the different types of USB ports to make an informed decision based on your specific requirements. The most common types of USB ports include:
1. Type-A USB:
- Type-A USB ports are the original USB connectors. They have a flat rectangular end that plugs into your power adapter (such as a wall outlet or computer), and the other end features a different connector for linking to your electronic devices. The device-end connector is often a mini- or micro-USB, resembling a miniature version of the standard Type-A connector. These ports are frequently used for phones and cameras. Type-A USB connectors are non-reversible, meaning they can only be inserted into the power adapter or device in one direction. They have limitations regarding power output and data transfer capabilities, making them more suitable for smaller electronics.
2. Type-C USB:
- Type-C USB connectors were introduced in 2014 with the goal of eventually replacing all other USB connectors. The Type-C connectors have a symmetrical design, allowing you to plug them into a device in any direction. They are capable of handling higher electrical loads compared to Type-A connectors, making them suitable for powering larger devices such as laptops and printers, in addition to phones and cameras. Type-C connectors can also charge your devices considerably faster than Type-A USB connectors. While some USB cables may have a Type-A connector on one end and a Type-C on the other, cables with Type-C connectors on both ends are increasingly becoming the standard.
USB outlets are available with Type-A USB, Type-C USB, or a combination of both. Since Type-A USB ports are still prevalent, but Type-C connectors are becoming the standard for electronics, it’s generally recommended to purchase an outlet that features both types of connectors.
Installing a USB Outlet:
Things You’ll Need:
- USB outlet with faceplate
- Screwdriver
- Non-contact voltage tester (optional)
- Needle-nose pliers (optional)
How to Install a USB Outlet – Step-by-Step Instructions:
Step 1: Turn Off the Electricity to the Outlet:
- To ensure your safety while installing the USB outlet, switch off the breaker connected to the electrical outlet you’ll be replacing in your home’s main electrical panel. After turning off the breaker, verify that there is no electrical current at the outlet by using a non-contact voltage tester or by plugging in an electrical device.
Step 2: Remove the Old Outlet:
- Use a screwdriver to detach the screw securing the decorative faceplate on the front of the old outlet and remove the faceplate. Then, use your screwdriver to remove the top and bottom screws holding the electrical outlet to the plastic box embedded in the wall – known as the “junction box.” Carefully pull the outlet out from the junction box to expose the wires connected to it.
- Use a screwdriver to loosen the screws on the side of the outlet that secure the wires in place – the “terminal screws.” You don’t need to fully remove the terminal screws; simply loosen them until the wires can be easily pulled out. Repeat this process for all the wires and set the old outlet aside.
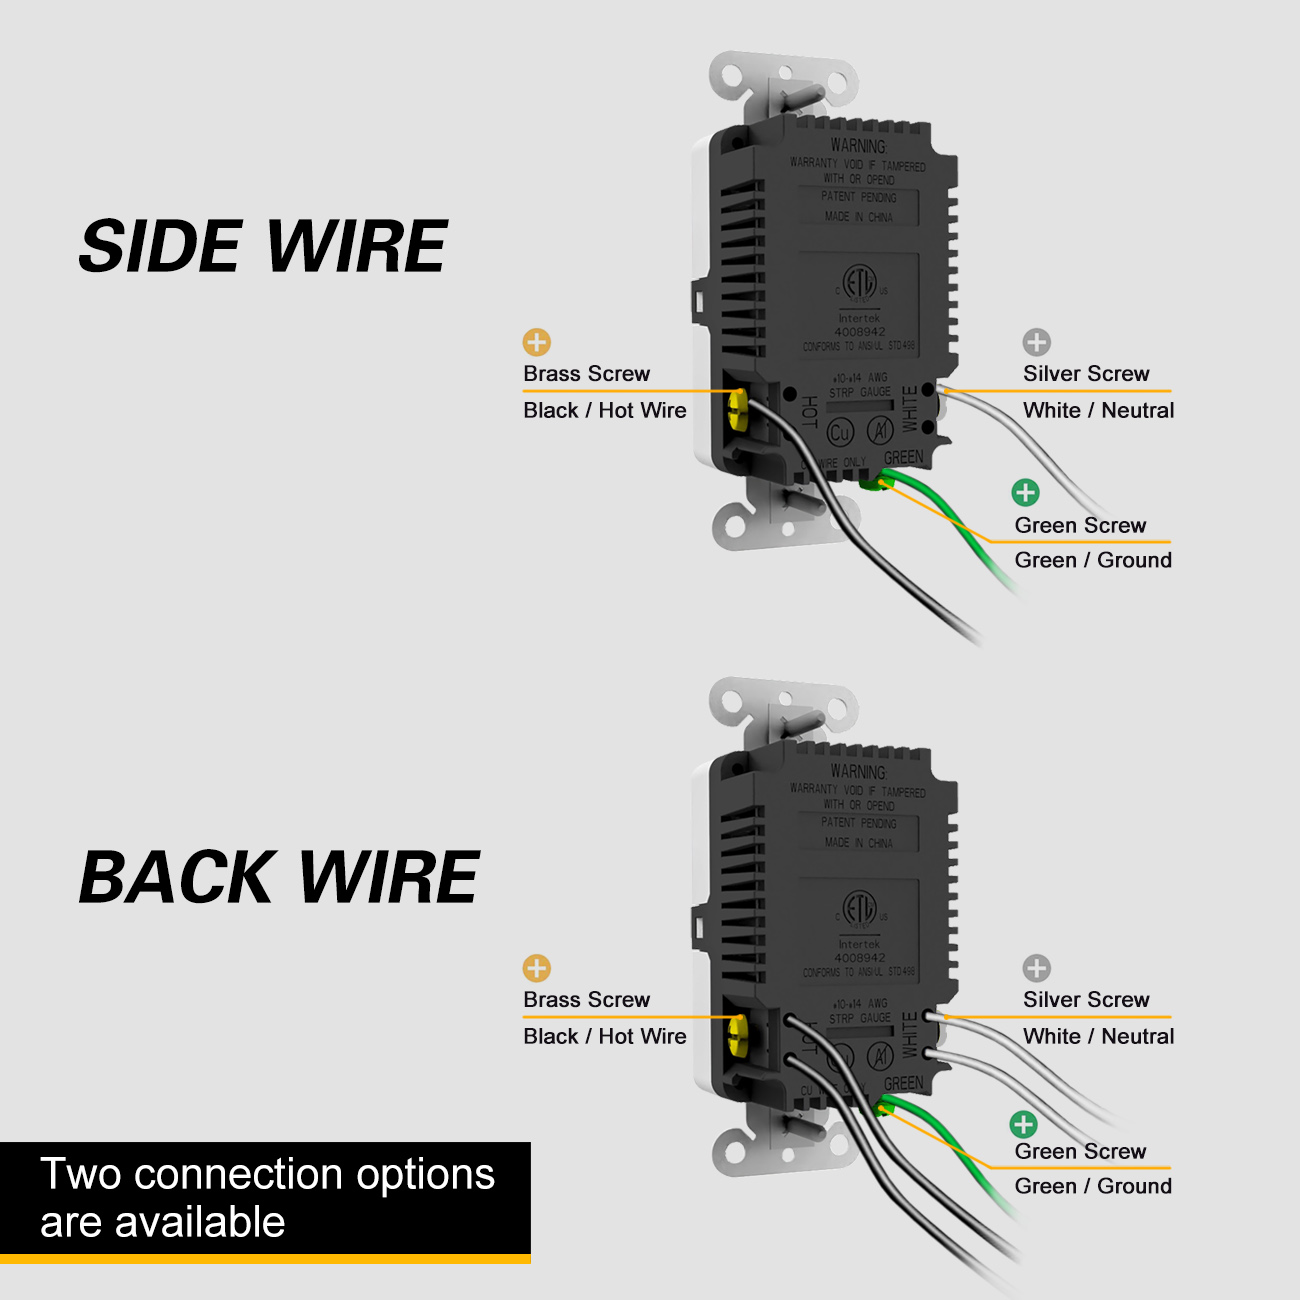
Step 3: Wire the USB Outlet:
- Connect the wires coming from the wall to the corresponding terminal screws on the side of the USB outlet.
- The black “hot” wire should connect to the brass-colored screw, the white “neutral” wire to the silver screw, and the bare copper “ground” wire to the green screw.
- Depending on the number of plugs on your USB outlet, there may be one or two white and black wires, but there will always be a single ground wire. Some outlets may have labeled terminals and color-coded wires.
- Many outlets require that the wires are wrapped around the terminal screw before tightening it to secure the wire in place. When needed, use needle-nose pliers to create a u-shaped “hook” on the exposed end of the wire, allowing it to wrap around the screw. Some outlets may have a small slot where the exposed end of the wires can be inserted. In this case, insert the bare wire into the slot and tighten down the terminal screw.
Step 4: Install the USB Outlet on the Wall:
- Carefully push the electrical wires and USB outlet into the junction box. Align the screws on the top and bottom of the USB outlet with the corresponding screw holes on the junction box, and use a screwdriver to drive the screws until the outlet is securely attached to the junction box.
- Finally, attach the new faceplate to the USB outlet. Some faceplates may be secured to the outlet with a single screw in the center, while others have a series of tabs around the outer perimeter that clip into matching slots on the outlet.
Step 5: Restore Power and Test:
- Reconnect the breaker in your main electrical panel, and test the outlet by either plugging in an electrical device or using a non-contact voltage tester.
With these steps, you can install a USB outlet in your home, making it more convenient to charge your electronic devices while keeping your standard electrical outlets free for other uses.
Post time: Nov-01-2023